Program API Simulator
Purpose
The purpose of the Program API Simulator is to allow Programs (Schemes) to simulate the main functionality of the LanternPay Program API. It is a developer tool, and will allow Program developers to a convenient means to test their code as it is being developed locally. Specifically, the developer can:
- Simulate receiving a webhook from LanternPay, with all the data that they would usually expect to receive
- Respond to the webhook via the LanternPay Program API endpoints and receive the expected codes and responses
- Modify or control the invoice data that is being received within the webhook
Moreover, Programs can also build onto the API endpoints, building the rules and validation needed on their end to successfully provide an outcome for a claim or invoice (eg. approved or rejected, etc.).
Simulator Flow
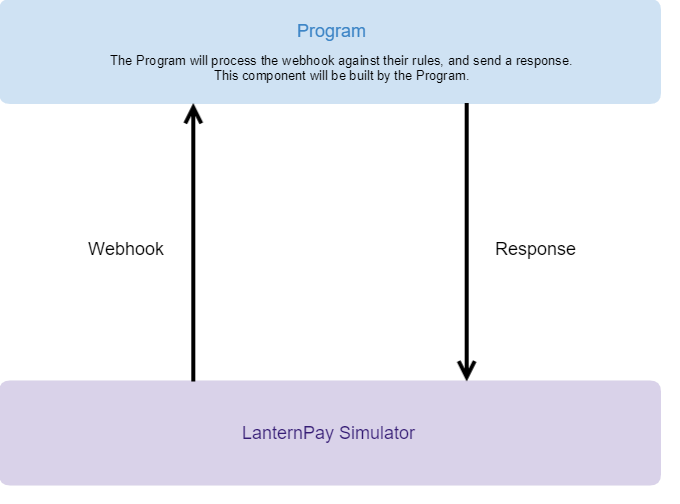
The diagram below illustrates the overall flow of how a Program will interact with the LanternPay via the Program API.
The Program will receive a webhook. The Program will then process that webhook and send a Response back to LanternPay.
Please note that the Program is the component that will be built by the Program.
Components of the Simulator
There are three components to the Program API Simulator.
Postman
- Used by the Program developer to trigger webhooks to their system
- Loads the invoice data into the LanternPay Simulator
- Fires a webhook to the Program, and checks that the webhook has been received.
- Checks that a response has been received from the Program in the LanternPay Simulator.
LanternPay Simulator
- Mimics the behaviour of the endpoints offered in LanternPay’s Program API.
- Allows the Program to test the responses sent by the Program’s system being developed.
- Sends appropriate response codes and responses to API requests.
Program
- The Program is the implementation of the Program system or gateway (i.e. the system being developed by the developer).
- Receives the webhook, processes it, and sends back a response into one of the URI’s available in the webhook.
- For example, the Program receives an
OnInvoiceSubmittedwebhook. - Program will then come up with the decision to Approve or Reject the claim.
- Program will then send back the response to the LanternPay Simulator.
- For example, the Program receives an
- The Program is to build their own rules to determine the outcome of a claim.
System Details
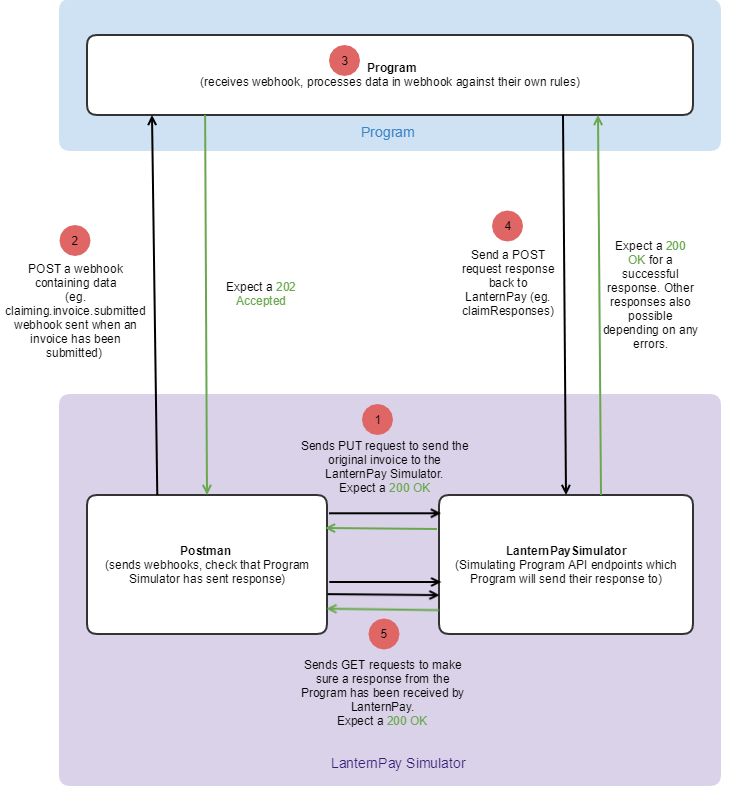
The diagram below illustrates every step involved in the LanternPay Simulator. Please note that Steps 1 and 5 are required for the implementation of the simulator. You do not have to worry about these steps.
Supported Use Cases
Currently, the simulator supports the following use cases:
- Invoice submitted by Biller for Program response
- Invoice predetermination requested by Biller for Program response
Other features, such as cancelling an invoice, biller, member and provider verification will be made available in the future.
The endpoints that the Program will respond to are explained below.
Invoice Submitted Response
| API Endpoint | Description | Field specifications | Expected Response Code |
|---|---|---|---|
POST {invoiceResponse} This link is the lp:invoice-response link relation in the onInvoiceSubmitted webhook. |
Sends an invoice response to LanternPay. | See Invoice Response | 200 OK |
Sample Invoice Submitted Response
Below is an example of a Response for an invoice.
{
    "type":"invoice",
    "claimResponses": [
        {
            "claimId": "ef5bc5d2-943e-473c-bfc4-dab2e252a000",
            "benefit": 0.00,
            "adjudications": [
                {
                    "reason": "Policy limit for Physiotherapy reached.",
                }
            ],
            "state": "rejected",
        },
        {
            "claimId": "ef5bc5d2-943e-473c-bfc4-dab2e252a123",
            "benefit": 90.05,
            "state": "approved"
        },
        {
            "claimId": "dff0efe6-ecce-4a46-a079-f70dff4d78fe",
            "benefit": 50.00,
            "state": "approved",
            "adjudications": [
                {
                    "reason": "The claim has been part-paid since you have run out of funds. Please contact the Program.",
                    "amount": "50.00"
                }
            ]
        }
    ]
}
Prdetermination Submitted Response
| API Endpoint | Description | Field specifications | Expected Response Code |
|---|---|---|---|
POST {predeterminationResponse} This link is the lp:predetermination-response link relation in the onPredeterminationSubmitted webhook. |
Sends a predetermination response to LanternPay. | See Predetermination Response | 200 OK |
Sample Predetermination Submitted Response
Below is an example of a response to a onPredeterminationSubmitted webhook.
Note that the only difference between the Invoice and Predetermination responses is the type flag. For an invoice, type = invoice and for a predetermination, type = predetermination.
{
    "type":"invoice",
    "claimResponses": [
        {
            "claimId": "ef5bc5d2-943e-473c-bfc4-dab2e252a000",
            "benefit": 0.00,
            "adjudications": [
                {
                    "reason": "Policy limit for Physiotherapy reached.",
                }
            ],
            "state": "rejected",
        },
        {
            "claimId": "ef5bc5d2-943e-473c-bfc4-dab2e252a123",
            "benefit": 90.05,
            "state": "approved"
        },
        {
            "claimId": "dff0efe6-ecce-4a46-a079-f70dff4d78fe",
            "benefit": 50.00,
            "state": "approved",
            "adjudications": [
                {
                    "reason": "The claim has been part-paid since you have run out of funds. Please contact the Program.",
                    "amount": "50.00"
                }
            ]
        }
    ]
}
Reference Implementation
In case you have not built any rules processing, and you want to see a live demo of how the overall simulator works, we have built a reference implementation of a Program. You can use LanternPay’s reference implementation and watch the whole end-to-end process unfold.
The instructions for configuring the Postman collection and environment files are described below.
How do I get started?
The guide below describes how you can simulate the flows for the onInvoiceSubmited and onPredeterminationSubmitted webhooks.
These webhooks are sent to LanternPay’s reference implementation, which then sends a response back to the LanternPay Simulator.
- Open up Postman on your computer. If you do not have Postman downloaded, you can download it here
 .
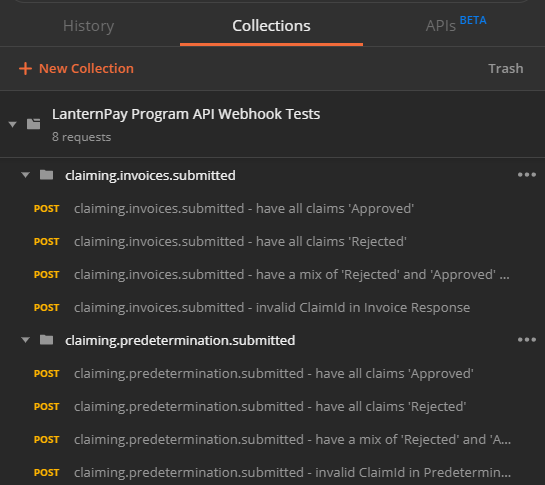
. - Import the LanternPay Program API Webhook Tests.postman_collection and Program API Test Env.postman_environment file as a Collection in Postman.
- Click on the Import button on the top-left corner of the page.

- The module below should appear. Choose or drop the
postman_environmentandpostman_collectionfiles.

- You should see the appropriate requests on the left hand side of the window. Expand the folder and subfolders to see all the requests.
- Click on the Import button on the top-left corner of the page.
- Change the environment to the
Program API Test Env.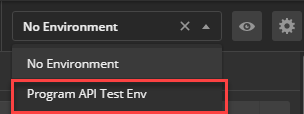
- Open the first request. This request sends an
onInvoiceSubmittedwebhook.- Click on ‘Send’.

- The Test Results should all pass. The Status Code should be a
202 Accepted. This is displaying that the webhook has been fired and received by the Program, a response has been sent by the Program and received by the LanternPay simulator, and the statuses of each claim isapproved.
Note: by pressing send, you are triggering a number of requests. Please refer to the System Overview section for information on every request involved.

- Click on ‘Send’.
- You can also see the original webhook sent in the body of the request.
- You can repeat the process for the other scenarios presented in the collection.
How do I use the simulator?
You can also use the simulator to assist you in developing your own implementation of the program. You will have to configure the environment setting to point to your program.
- On the top-right corner of the page, click on the eye icon and then select pencil icon next to the
baseURLvalue.

- Change the current value to the route that your program is running on,
- You can now send a webhook to see how your system handles it.
Note: The invoice inside the body of the request can be modified with other sample data to test how the Program’s implementation. handles different data, eg. add in valid data to expect a claim to be approved by your system, and have invalid data to result in a claim to be rejected.
Changing fields based on certain values
If using the LanternPay reference implementation, you are able to change certain values in the invoice to mock the Response that is sent by the reference implementation. These fields are described in detail below.
Setting a specific claim status
The end of the itemDescription field can be appended with :approved or :rejected for the specific claim to have that state in the response from the reference implementation.
"itemDescription" : "Assistance with daily activities:rejected"will set the status of the claim of"rejected"in the claim response."itemDescription" : "Assistance with daily activities:approved"will set the status of the claim of"approved"in the claim response.
Sending the Correct Claim Ids
The end of the sequence field can be appended with invalidClaimId for the claimId to be returned incorrectly to LanternPay’s API endpoints.
"sequence" : "1:InvalidClaimId"will use invalid claimId(s) in the response from the reference implementation. This will return a400 Bad Requesterror."sequence" : "1", will use valid claimId(s) in the response from the reference implementation. This will return a200 OK.
Recommendations
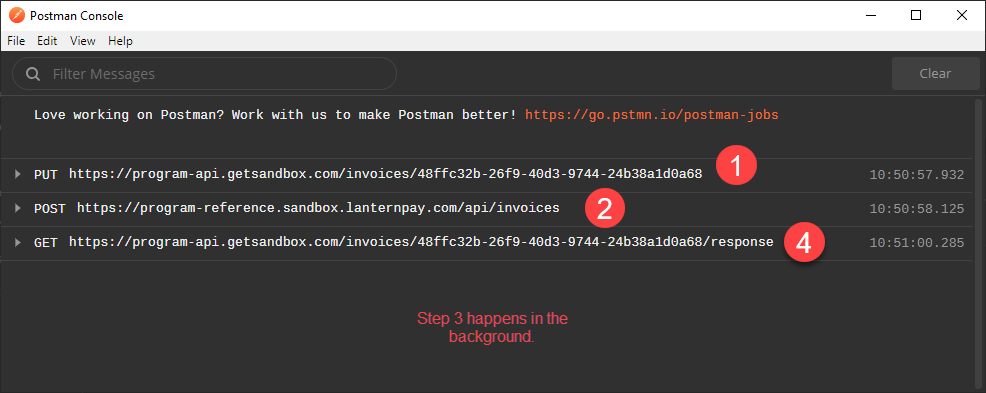
It is recommended to keep the Postman Console open when testing these webhooks. This allows you to break down the separate requests that are being sent. Make sure you have the console open before you send the request. You can do this by navigating to View > Show Postman Console.
You should see the list of requests going out of Postman similar to the ones below.
- A PUT request placing a copy of the webhook into the LanternPay simulator.
- A POST request sending the webhook to your Program or LanternPay’s reference implementation.
- The Program processes the webhook and sends a response to LanternPay Simulator. This step is not shown in the console.
- A GET request to get the responses from the LanternPay sandbox, and display in the Postman UI.
For more information on the Program API Specifications please read the reference here.